When we talk about packages, we generally refer to scalable aggregated blocks of software or libraries. In fact, a package can be used by multiple applications by importing or extending the package itself.
Docker is a tool that will make your life as a developer easier. We are talking about an open-source project that can automate the deployment of applications inside software containers; in essence, a platform that will enable you to create, test and distribute applications via containers.
Docker Package: the concept of “image”
The concept of package can be thought of as ‘Docker with images’, or Docker image. A Docker image usually contains a set of instructions for creating containers. Containers are instances of running software. Bear in mind that you can create multiple containers from the same image.
For example, if I wanted to create multiple instances of ngnix to satisfy a number of HTTP requests, I can do it starting from the same nginx image.
Following the same example, you may be wondering how – starting from the ngnix public image – you can apply a custom configuration to your web server.
It’s very simple: you have to create a custom image in which, starting from the nginx base image, you apply steps to which you add the custom nginx configuration.
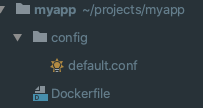
To do this, we create a new project which we will call myapp. Inside the project, we create a file called Dockerfile, and a config folder with the default.conf file.
Let’s create our configuration within the config/default.conf file. The example contains a dummy configuration in which requests are forwarded to a PHP server.
Now let’s create the new image creation steps inside the Dockerfile.
As you can see, we perform three steps, the last of which is definitely optional and which has the sole purpose of showing the RUN command. Starting from the top, the FROM command indicates which image to start from when creating the new image. On the other hand, COPY has two arguments: the file to be copied and its final destination within the image. This is how we copy our custom nginx configuration to the appropriate folder within the image.
In addition to copying files, you can execute commands with the RUN command. This is useful for automating the installation of additional software or other purposes.
There are many other commands for the Docker file; you can find the complete reference at this address by clicking here where you can find a most interesting source if you intend to work with Docker seriously.
Launching the Docker Build Command
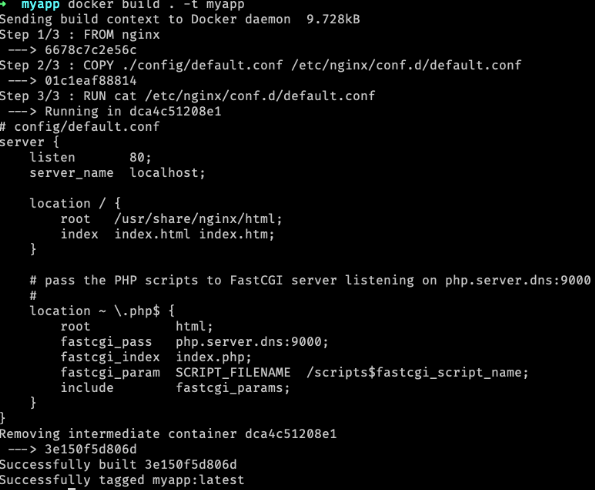
Once the files have been created, from the terminal you can simply launch the docker build command to create the new custom image.
As you can see from the image, the three steps described in the Dockerfile are executed in sequence. The -t argument of the docker build command enables you to name the image. At this point, our image will be available for use:
With this mini-guide you should now be able to create an image with Docker yourself. See the reference we mentioned in the previous paragraph for more details and start experimenting!
Read related articles
Kubernetes Cloud: Cloud services for Kubernetes, practical mini guide
Kubernetes Cloud: let’s see up close Amazon Elastic Kubernetes Service (EKS), Google Kubernetes Engine (GKE) and Azure Kubernetes Service (AKS)
How Kubernetes works: operation and structure
How Kubernetes works: a mini guide to one of today’s most important tools for developers. How does Kubernetes work? As
Docker vs Kubernetes: let’s see how they differ
Docker vs Kubernetes: let’s see how they differ and why it sometimes gets a little confusing We often hear people

 Italiano
 Español


